Indexing JetBrains Toolbox Application

I’ve had Alfred search issues on my M1 MacBook Pro when it came to trying to run applications installed by JetBrains Toolbox. I used the Alfred self-diagnostics tool to figure out what was going on with one of the apps, Rider, and received the output below:

Starting Diagnostics...

File: 'Rider.app'
Path: '/Users/bergren2/Applications/JetBrains Toolbox'

-----------------------------------------------------------

Check file cache database...

✅ File cache integrity is ok

-----------------------------------------------------------

Check if file is readable...

✅ Alfred has permissions to read this file.

Unix Permissions: 493
Underlying Type: NSFileTypeDirectory
Extended Attributes: (
    "com.apple.macl",
    "com.apple.provenance",
    "com.apple.quarantine"
)

-----------------------------------------------------------

Check if volume '/' is indexed by macOS...

✅ Indexing is enabled on this drive

-----------------------------------------------------------

Check direct file metadata...

⚠️ Direct metadata is missing, this file is likely not indexed by macOS

Display Name: 
 Other Names: 
Content Type: 
   Last Used: 

-----------------------------------------------------------

Check mdls file metadata...

❌ macOS metadata missing essential items

kMDItemFSContentChangeDate = 2023-01-20 02:20:40 +0000
kMDItemFSCreationDate      = 2023-01-20 02:20:40 +0000
kMDItemFSCreatorCode       = ""
kMDItemFSFinderFlags       = 0
kMDItemFSHasCustomIcon     = 0
kMDItemFSInvisible         = 0
kMDItemFSIsExtensionHidden = 0
kMDItemFSIsStationery      = 0
kMDItemFSLabel             = 0
kMDItemFSName              = "Rider.app"
kMDItemFSNodeCount         = 1
kMDItemFSOwnerGroupID      = 20
kMDItemFSOwnerUserID       = 501
kMDItemFSSize              = 1
kMDItemFSTypeCode          = ""

-----------------------------------------------------------

❌ Troubleshooting failed

The root of the issue was that the application wasn’t showing up in Spotlight, so I took to the Internet to search for a way to re-index or add the application. It led me to run this:

mdimport ~/Applications/

And while this seemed to do the trick, I was still getting the instance of Rider that exists in ~/Library/Application, but only in Alfred. And Alfred is supposed to ignore it! So knowing that Spotlight was correct — it was only showing the version in ~/Applications/ — I typed “reload” into Alfred to reload the cache and remove the extra instance.

I first became an Alfred user back when Spotlight wasn’t as powerful, and tools like it and Quicksilver were a must-have. Now? I’m not so sure. However Alfred has become a staple part of my workflow, even when it comes to generating GUIDs or quickly opening Jira links when I have ticket ID. And remember Ubiquity for Firefox? Most of that functionality is replicated just fine in Alfred, but I still dream about highlighting an address and seeing it pop up on a map. That was peak Late Aughts.

Edit: I ran into issues indexing core Mac apps — things like Mail.app and Messages.app weren’t showing in Spotlight. It turns out they aren’t actually in /Applications and are instead in /System/Applications — you can easily verify this in terminal using ls on the respective directories. The solution was to delete ~/Library/Preferences/com.apple.spotlight.plist and restart, which I found out about through this guide. Now that I know that this file was being buggy, I wouldn’t be surprised if it was another buggy casualty of the transfer from my old MacBook Pro.
Homebrew M1 Migration

As part of my MacBook upgrade, I directly transferred my old laptop’s data into my new one. So when I naively ran brew update I received the following:

/usr/local/Homebrew/Library/Homebrew/cmd/update.sh: line 37: /usr/local/bin/git: Bad CPU type in executable

Rather than try to debug this and countless other libraries not working because they were intended for Intel instead of ARM, I used the opportunity to uninstall Homebrew and start fresh. After reinstalling Homebrew and adding the recommended commands to my .zprofile to add Homebrew to my PATH, I was in good shape.

Hello Vim, my old friend

When checking my .zprofile for errors, I noticed Vim was yelling at me. That reminded me of my dotfiles repo, so I ran to its README to run the installation instructions. And they worked! So while Vim these days is used more for the occasional commit message edit and not my entire workflow, I’m still very grateful for having a good jumping off point for a fresh install. It also reminds me I should add things like fnm and gh if I want them to be part of my toolchain by default.

Speaking of Git

As soon as I finished that thought I ran into this error trying to commit:

error: gpg failed to sign the data
fatal: failed to write commit object

Great! So now I need to figure out how to get my signing working again.

1Password CLI and SSH Signing

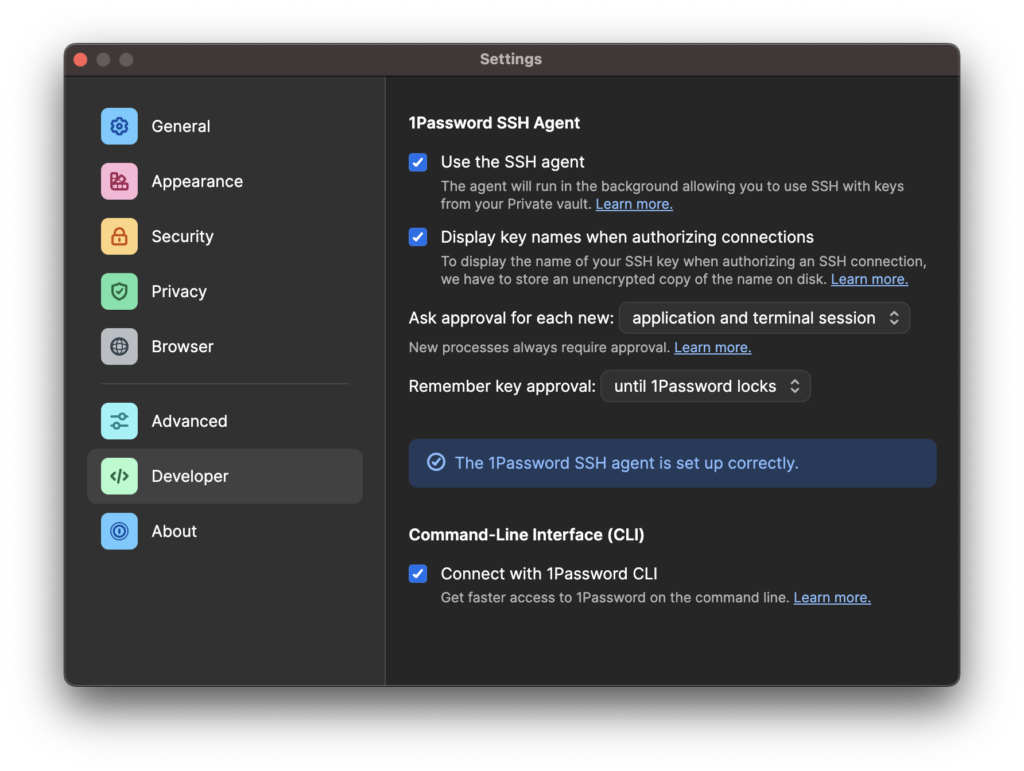
1Password has a CLI that can be downloaded directly or installed via brew install 1password-cli. I just had to check a few boxes and told 1Password to configure my ~/.ssh/config correctly.

1Password Developer configuration screen

After I imported my old key to 1Password it prompted me to set-up commit signing with SSH — I didn’t know that was a thing! So after adding my SSH key as a signing key (instead of as an auth key — it was already added as such), I was able to see the fruits of my labor:

My latest dotfiles repo commit, in all its verified goodness

Because the new MacBook has a fingerprint reader, I can easily add that as an additional check whenever I need to sign my commits. Maybe not the most necessary given what I do day-to-day, but I think it’s neat and glad it was so easy to use.

MacBook Upgrade

I finally caved and upgraded my 2015 MacBook Pro to a 2021 M1 Pro MacBook Pro. I had toyed with upgrading the battery on the 2015 MBP because that was the major pain point (couldn’t really go anywhere unplugged), but I also missed having more screen real estate and the fan would kick on for the simplest tasks. Now that my data transfer is complete, I’m taking inventory of the applications I use and figuring out which ones are worth keeping around. So far, here is my list:

Most of these apps “just worked.” The few that didn’t I just had to redownload the M1 image and I was fine — all of the data was preserved, and at most I just needed to re-login.

Annoyances

  • I had to rebind Caps Lock to Esc
  • Edge didn’t sync some settings, such as default search engine or remembering passwords 🙄

Next Up

  • JetBrains silliness listed above
  • Fork is crashing on launch, so will need to figure that out
  • Homebrew updates, key updates, etc
  • Because I transferred my old MacBook directly to my new one, there’s seven year’s worth of cruft I need to work through

Windows Development

With the recent advent of .NET 5, I’m taking the plunge and setting up my gaming PC as a development work station. I haven’t had to setup a Windows PC since last year, so I figured it was time to revisit my setup and document what I did. Here we go!

Scoop

Chocolatey is usually the go-to package manager on Windows, but for awhile I’ve been watching the cool things done over at Scoop. After installing it, I wanted to do a few more things.

sudo command

It’s generally a pain-in-the-ass to run CLI things with elevated permissions, and in the past I’ve just run PowerShell as an admin. With the introduction of Windows Terminal, it’s once again difficult to just run things in admin. And that’s fine, really — we shouldn’t be running everything as admin anyway. So to make our lives easier, we can do the following in an elevated PowerShell terminal.

scoop install sudo --global

Then later — when we’re back in a non-elevated PowerShell in Windows Terminal — we can just do sudo <command> and be on our merry way. The sudo command will take care of prompting us to accept the elevated permissions (which we’re used to doing on Windows anyway with that second-nature pop-up) and then run the command, no-sweat. Tadaa! Then later when we want to install global packages like vim we can run the following without a second thought:

sudo scoop install vim --global

Default Git Config

There are a few approaches to this. The first is to figure out where your config file is and just edit it directly. You can figure out where each config is located by running the following:

git config --list --show-origin

The second way is to just run a bunch of commands, since that way you don’t need to worry about getting the syntax right. Here’s a list of commands I usually run:

git config --global core.editor "vim"
git config --global alias.co checkout
git config --global alias.b branch
git config --global alias.ci commit
git config --global alias.s status

PowerShell Setup

Next I want to activate some nicer features in PowerShell, so I need to edit my PowerShell profile. Since its location is stored in $profile I can just do

vim $profile

I can then add the following, for starters:

Import-Module posh-git
 Import-Module oh-my-posh
 Set-Theme Zash

 Set-Location ~/Workspaces

Obviously there’s lots more customization you can do. Scott Hanselman wrote a good post to get you started.

AutoHotkey

AutoHotkey is a lifesaver for anyone wanting to do keystroke customization on Windows. I specifically use it to rebind my caps lock key to escape. Below is the script I launch when Windows starts. (The script isn’t actually Ruby, but I wanted to get some syntax-highlighting working for y’all.)

#SingleInstance force
Capslock::Esc

Conclusion

There’s a lot of customization to be had here! My next steps will probably be to automate setup to some degree — I’ve already done that with my dotfiles repository for macOS. Now that I’ve become much more of a .NET developer over the years, I think it makes sense for me to be able to do development on either my MacBook Pro or my Windows gaming rig, whichever feels more comfortable, subject to my whimsy.

PowerShell 7.1

Howdy! It’s been awhile. Just wanted to write a quick update about setting PowerShell 7.1 as my new default PowerShell.

  1. Install PowerShell 7.1
  2. Find the PowerShell shortcut. I usually do this by searching using the Windows menu.
    1. Mine was here: C:\ProgramData\Microsoft\Windows\Start Menu\Programs\PowerShell
    2. If you installed via the Microsoft Store it’s slightly more complicated but still possible, I just don’t have the steps on-hand.
  3. Open a new Explorer window and go to C:\Users\{Username}\AppData\Roaming\Microsoft\Windows\Start Menu\Programs\Windows PowerShell to find the shortcut that Windows uses when you right-click the Windows icon and choose “PowerShell”
  4. Replace that shortcut with a copy of the one for PowerShell 7.1
  5. Test it out!

These steps apply to any version of PowerShell, but I’ve found them especially useful for 6 and 7. I wanted to get it figured out as I get Vagrant and Docker setup on my gaming PC so I can mess around with them in Windows. Cheers!

Edit: I tried the Windows Store installation of PowerShell and it just worked! It must update something similar to what I set for the above steps. To clarify a bit, here’s the target that I had for the “Windows PowerShell” shortcut located above:

"C:\Program Files\PowerShell\7\pwsh.exe" -WorkingDirectory ~

Deleting Old Git Branches — PowerShell Edition

I did a post on this earlier (I’ll link it once it’s uploaded, perhaps), but it relied on me being in a Unix-like system. Because I do Windows development right now, I wanted a way to easily do this in PowerShell. StackOverflow certainly has answers, but I cobbled together my own version below that works for the toolkit I have.

git branch --merged | rg -v "(^\*|master)" | %{ git branch -d $_.trim() }

ripgrep has been in my toolkit for years now at this point, so I used it for filtering out master. The last piped part is strictly used in PowerShell and was the part I was missing, since I was used to using xargs before. Tada! Works like magic.

Generating Stored Procs for DbUp

Retrieving the Procs

I recently tasked myself with setting up DbUp to add database migrations to a .NET project at work. It was straightforward enough to generate the table definitions with DataGrip but I needed to get my hands dirty to create the stored procedures. To get a lay of the land, I checked out my favorite schema in SQL Server, INFORMATION_SCHEMA.

SELECT * FROM INFORMATION_SCHEMA.ROUTINES

The columns I care about here are ROUTINE_NAME and ROUTINE_TYPE, the latter which I want to make sure is always “PROCEDURE”, which it is for my case. (yay) ROUTINE_DEFINITION is also worth paying attention to, but it’s capped at 4000 characters so I need to query the sys schema to make sure I get the full procs. Below is the information I need.

SELECT 'NEW PROC STARTS HERE', o.name, sm.definition FROM sys.sql_modules sm
INNER JOIN sys.objects o
ON sm.object_id = o.object_id AND o.TYPE = 'P'

I take this output in DataGrip and download it to a TSV I can parse later to create a set of SQL scripts that can be run to create the procs in my database.

Creating Temporary Proc Files

At this point it’s worth noting that if I had a SQL GUI that let me select all the procs and download them to a set of scripts, I would totally just do that. So I want to re-iterate what I’m trying to accomplish so I don’t go down a rabbit hole:

  • Each proc needs to be its own SQL script named after the proc
  • I want to parse this TSV without altering it
  • I shouldn’t have to do this again

That last point is worth discussing — it’s true I won’t have to do this again for this project (since future procs will be in source control and using DbUp for change management), however if this were worth turning into a generic tool then I’d want to make this parsing code re-runnable. I used to work at a company that would’ve definitely benefited from such a process, but alas they never encouraged me to go down this path and clean-up their bad practices.

Exploratory Parsing

To kick things off, I looked for my NEW PROC STARTS HERE text to figure out what kind of formats I had to deal with. In short, it looked a bit like this:

NEW PROC STARTS HERE	SelectSomeStuff	"create procedure

The only thing I could count on was that after that first double-quote, the proc would actually begin. Then we’d have newlines that would get introduced that would be part of the proc. We’d only know we were at the end when we got to another NEW PROC STARTS HERE delimiter.

The Script

Here’s what I cobbled together using the guidelines above.

class ProcFile
  attr_accessor :name, :contents

  def initialize()
    @contents = ""
  end
  
  def write_to_file
    File.open("#{@name}.sql", "w") do |f|
      f.write(@contents)
    end
  end
end

proc_start = "NEW PROC STARTS HERE"

new_proc = ProcFile.new()
File.readlines("procs.tsv").each do |line|
  line.sub!("CREATE PROCEDURE", "CREATE OR ALTER PROCEDURE")

  if line.include?(proc_start)
    # NEW PROC STARTS HERE\tProcName\t"This Is The Proc
    r = /^NEW PROC STARTS HERE\t(.+)\t"(.+)$/

    unless new_proc.contents.empty?
      new_proc.write_to_file()
    end

    match_data = r.match(line)

    new_proc = ProcFile.new()
    new_proc.name = match_data[1]
    new_proc.contents = match_data[2]
  else
    new_proc.contents += line unless line =~ /^"$/
  end
end

# write final file
new_proc.write_to_file()

Translating to a DbUp-Friendly Structure

Here’s the CLI tool syntax I wrote to create new database migrations from scratch:

$ customtool generate migration --name CreateNewTable

And this would create something like 20200214200931_CreateNewTable.sql and put it in the Migrations directory and everyone would rejoice. But unlike table definitions and other types of migrations I’d like to run, I want to treat my procedures more like code where the whole thing gets re-run anytime I know it changes. Therefore, my tool needs a new syntax.

$ customtool generate procedure --name SelectSomeStuff

This command instead deposits generated procs in the Procedures directory. Order no longer matters, so there’s no timestamp component to the filename. And when I want to run them, I just do:

$ customtool deploy procedures

Caveats

It should be obvious, but I want to note this here — the script I wrote mostly worked. It didn’t quite work when the SQL syntax wasn’t capitalized correctly or spaced consistently through all the scripts. To test the stored procedures I converted, I ran them locally and made an assumption that any conversion issues would show up as syntax errors and not still be valid SQL. You’re always better off doing a healthy dose of testing — even though this is still in-progress for me, I plan to run the CREATE OR ALTER on the lower environments so we can verify that everything works as intended now and not have to worry about it later if I run all the procs and introduce some small bug.

It’s also worth noting that this is exactly why stored procedures aren’t popular in frameworks like Ruby on Rails. They’re so difficult to test and do change management on! I really only encountered them when I entered .NET land, and then I was horrified how often engineers I worked with thought they were a good idea to implement. Yes, you can get performance gains from them. But you’re almost always better off doing something else that’s a bit more testable, just so you can sleep at night.

Addendum: System.CommandLine

Wasn’t going to write much here, except to say that I’m using the new System.CommandLine library to write my CLI tool. It’s still in pre-release but the functionality it currently provides is more than enough for me to write my tool without incurring too much of a headache either parsing the input myself (i.e. I don’t use a library) or learning a confusing library API, which was my experience with Command Line Parser.

Upgrading PHP

WordPress now has a health check you can run against your site to make sure it has all the latest bells and whistles. You can find it under Tools > Site Health — this is new to me, but I haven’t used WordPress in years.

My health check had some straightforward items — including to remove themes I wasn’t using. But there were two that I knew I would have to get my hands dirty for — upgrading PHP to at least 7.3, and installing the PHP extension imagick. I had to bumble around the Internet to figure out all the steps, so I figured I’d detail my findings here to make sure I understood what I did.

Installing PHP

I decided to go straight to PHP 7.4 since it’s the latest and this WordPress blog doesn’t have a lot of customization. On my host DigitalOcean, Ubuntu 18.04 comes with PHP 7.2 by default. So first thing was to SSH into the box and start getting the relevant packages.

$ apt-get install software-properties-common
$ add-apt-repository ppa:ondrej/php
$ apt-get update
$ apt-get install php7.4

The software-properties-common was already installed, but I’m pretty sure it enabled me to add the Personal Package Archive (PPA) on the next line. It looks like Ondřej Surý maintains the PPA for PHP — seems odd, but I saw multiple sources cite this repo so I went ahead with it. Then I ran a standard apt-get update and installed PHP 7.4 next.

For a sanity check, I ran php --version and was surprised it was on 7.4! But alas, this wasn’t enough for WordPress to start using it. So next I had to figure out how to get off of PHP 7.2.

Loading PHP Via Apache

This part was cool b/c I learned more about how Apache works! In the /etc/apache2/mods-available directory are a list of available mods for Apache to use, including php7.2.load and the newly installed php7.4.load. My gut told me I had to enable PHP 7.4 and disable 7.2, so that’s exactly what I did.

$ a2dismod php7.2
$ a2enmod php7.4
$ systemctl restart apache2

Loading Remaining WordPress Libraries

There was a DigitalOcean tutorial that suggested I install the following commonly-used WordPress PHP extensions.

$ apt-get install php-curl php-gd php-mbstring php-xml php-xmlrpc php-soap php-intl php-zip

Of course that wasn’t enough. After making Apache configurations above and restarting, I was told I needed to install the MySql extension.

$ apt-get install php-mysql

This worked! Now that I had WordPress running on 7.4, I went ahead with the remaining imagick extension.

$ apt-get install php-imagick

That’s it!

Execute Program

I recently started getting into Execute Program — it comes free with a subscription to Destroy All Software and I was feeling a bit down about work. (More on that later.) I’m making my way through the JavaScript Arrays course as a mix of refresher and new. Once I’m done (or close to done), I’ll attempt TypeScript, since there are some things I want to build in React using it and it’ll be useful at work.

Speaking of work and why I was feeling down: I had a pretty bad week last week. I was really struggling with the codebase I was working in and wasn’t quickly learning from my mistakes. This week has started off better; I attribute that both to a better attitude and my amazing co-workers. Everyone is really supportive of each other and that goes a long way towards getting myself out of a rut. On top of that, over the weekend I reflected on where I was mentally and I think that’s helping me figure out how to ground my problem-solving.

So that’s why I’m continuing to do the JavaScript learning. It’s useful. It’s fun. It’s productive. Of course I’d love to create my fantasy football API or build a React project in TypeScript but those projects take a lot of energy and right now I only have so many spoons to give.

I’ll catch ya’ll later. Hoping to make this a more regular thing.

Rails + Puma + Capistrano + Nginx

About a month ago I decided I wanted to get a website going for Cerulean Labs, my catch-all organization that has supported game dev, mentoring meetups, and other random group projects. It would be good to have a website that allowed users in the organization to coordinate meeting up, sharing projects, and reviewing important info like community guidelines.

I specifically chose Rails because I haven’t developed on it since Rails 3 and I miss developing in Ruby. Puma is the default app server out of the box, and Capistrano takes care of deploys. Last, Nginx is used as a proxy.

Installation

Below are the components I had to install on the host machine. The order is all out of whack — I bounced around as I figured out what still needed to be setup. If you’re looking for specific guides, check out the bottom of this post.

SSL Certificate

I used Let’s Encrypt to get my certificate. First, I setup my dependencies:

$ sudo add-apt-repository ppa:certbot/certbot
$ sudo apt-get update
$ sudo apt-get install python-certbot-nginx

Installing the cert:

$ sudo certbot --nginx -d www.ceruleanlabs.com

Testing renewal:

$ sudo certbot renew --dry-run

It’ll prompt you along the way but the questions are straight-forward.

Nginx Gotos

I used the following when I wanted to check the syntax of my config files, check to see if nginx was running, and then to restart it whenever I made a change.

$ sudo nginx -t $ sudo service nginx status $ sudo service nginx restart

Nginx Config

When you first look at /etc/nginx/sites-available/default it looks something like this:

server {
    root /var/www/html;

    index index.html index.htm index.nginx-debian.html;
    server_name www.ceruleanlabs.com; # managed by Certbot


    location / {
            try_files $uri $uri/ =404;
    }

    listen [::]:443 ssl ipv6only=on; # managed by Certbot
        listen 443 ssl; # managed by Certbot
        ssl_certificate /etc/letsencrypt/live/www.ceruleanlabs.com/fullchain.pem; # managed by Certbot
        ssl_certificate_key /etc/letsencrypt/live/www.ceruleanlabs.com/privkey.pem; # managed by Certbot
        include /etc/letsencrypt/options-ssl-nginx.conf; # managed by Certbot
        ssl_dhparam /etc/letsencrypt/ssl-dhparams.pem; # managed by Certbot
}

server {
    if ($host = www.ceruleanlabs.com) {
        return 301 https://$host$request_uri;
    } # managed by Certbot

    listen 80 ;
    listen [::]:80 ;
    server_name www.ceruleanlabs.com;
    return 404; # managed by Certbot
}

The first server block shows a default Nginx page. The second block makes sure that your site is always served over HTTPS.

We want to first add an upstream block that points to where our Puma socket will be located. I put this at the very top of the file:

upstream puma {
    server unix:///var/www/ceruleanlabs/shared/tmp/sockets/puma.sock fail_timeout=0;
}

Next we want to rewrite the guts of that server block that is currently serving the default Nginx page. Mine looks something like this, given we’re serving a Rails app via Puma:

server {
    root /var/www/ceruleanlabs/current/public;
    access_log /var/www/ceruleanlabs/current/log/nginx.access.log;
    error_log /var/www/ceruleanlabs/current/log/nginx.error.log info;
    server_name www.ceruleanlabs.com;

    location ^~ /assets/ {
        gzip_static on;
        expires max;
        add_header Cache-Control public;
    }

    try_files $uri/index.html $uri @puma;
    location @puma {
        proxy_set_header X-Forwarded-For $proxy_add_x_forwarded_for;
        proxy_set_header Host $http_host;
        proxy_redirect off;

        proxy_pass http://puma;
    }

    listen [::]:443 ssl; # managed by Certbot
        listen 443 ssl; # managed by Certbot
        ssl_certificate /etc/letsencrypt/live/www.ceruleanlabs.com/fullchain.pem; # managed by Certbot
        ssl_certificate_key /etc/letsencrypt/live/www.ceruleanlabs.com/privkey.pem; # managed by Certbot
        include /etc/letsencrypt/options-ssl-nginx.conf; # managed by Certbot
        ssl_dhparam /etc/letsencrypt/ssl-dhparams.pem; # managed by Certbot

    error_page 500 502 503 504 /500.html;
    client_max_body_size 10M;
    keepalive_timeout 10;
}

Firewall Config

This part was also straightforward, and again I followed the guide at the bottom of this post. I pretty much just ran the following commands:

$ sudo ufw allow "Nginx Full"
$ sudo ufw allow "OpenSSH"
$ sudo ufw delete allow "Nginx HTTP"

$ sudo ufw status

Ruby Setup

$ curl -fsSL https://github.com/rbenv/rbenv-installer/raw/master/bin/rbenv-installer | bash

I then followed the rbenv guide for installing it to my shell so it would be available when I’m running commands remotely via Capistrano. You can set that shell for that user with chsh -s /bin/bash — using Bash, for example, with a ~/.bash_profile that looks like this:

export PATH="$HOME/.rbenv/bin:$PATH" eval "$(rbenv init -)"

JavaScript Runtime

We need a runtime for compilation of the Javascript components. I ended up just installing Node on the host machine, but you can also add something like mini_racer to your Gemfile to add support as well.

Deploys

$ cap production deploy

Additional Setup

This is all open-source, so you can of-course check out the rest of the app configuration on GitHub: https://github.com/ceruleanlabs/ceruleanlabs.com The rest of the changes I had to make mostly centered around configuring the Rails app with the correct database credentials, libraries, etc. I should’ve written my steps down better haha, but you’ll find the rest of what’s configured in the repo.


Useful Docs and Guides